Having performed the conversion of numerous old Brunswicks, I offer the following process:
I obtain Verhoeven rubber (Kleber Gray) directly from Messrs. Verhoeven,
Lucas or Derek, in Belgium (Telephone 011-32-3312-1159, FAX
011-32-3311-7450).
http://www.verhoeven-biljarts.be. They are fine people to work
with. They will advise you regarding current pricing (approx $175 plus
$50 shipping per table in 1999) and how to wire funds to their Antwerp
account. Ask them to use UPS and you will avoid customs difficulties
(nothing serious in any event).
The conversion is not difficult for a normally skilled woodworker with
access to a good tablesaw and bandsaw. The most precise work is shaping
the poplar rail liners to replace the old ones on the table. While it
is sometimes possible to modify the old liners, they are generally in
poor condition; one will be money (and years of use) ahead to build new
liners.
Use kiln-dried 8/4 poplar for the new liners, NOT Philippine Mahogany or
maple or other woods. Maple is too hard as a liner, and makes removing
staples for recovering a most difficult process. Philippine mahogany (Lauan)
is too soft and will splinter badly after only a few recoverings. It is
not essential to build ten-foot liners if that length stock is not
available. I have used 60” liners and butted two together in making the
long rails. From my experience, expect a 10-20% waste from the poplar
twisting as it is cut – if the wood is heavy, it is too wet.
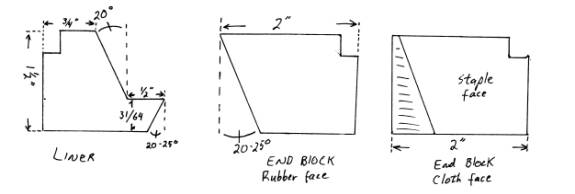
Cutting separate end blocks for the corners, not simply putting a wedge
on top of the liner, will make long term maintenance easier by being
able to replace the entire block when corner stapling wears the ends
out. The blocks measure 2” X 2” to fit the corners nicely. Angle the
face that will be stapled through the cloth inward perhaps 5 degrees, so
the top edges butt each other but taper slightly away from each other
down to the table; this will provide clearance for cloth folds and
staples and a bit of a “dust hole” under the rail (European tables all
build this way). You will need four right-ends and four left-ends per
table. Assemble the liners on the rails with one end block attached
before you apply the rubber, then cut the rubber to length and glue on
the remaining end block. I used an air- nailer with 1 ½ brads on both
liners and end-blocks, in addition to gluing and clamping the liners.
I
have dimensioned the liner cuts on the drawing; these should fit
virtually every old Brunswick you might encounter The contact point on
the nose of the Verhoeven rubber is actually a little lower than you
will want to make it – that is why the liner-shelf height is 31/64. (If
you make the shelf 15/32, you will likely get a “hop” off the rail.)
The nose height should be between 1 29/64 and 1 31/64.
I
had greater success using a bandsaw with a resaw blade (1/2 or ¾) to cut
the old liners off the rails than using the table saw. I could avoid
cutting into the main rail easier and a little hand planning finished the
cuts nicely. If the old liners are original and quite worn, you can
even pop them off with a broad chisel (2-3” width) and a mallet! (Worked
like a charm on some tables!) If your liners have been replaced before,
check them carefully for screws or nails before running them through the
saw; it can be a nasty surprise! Don’t assume a carbide blade will
survive the nails: the carbide will dull or chip when it hits the nails
or screws and the blade will immediately warp in the cut – you could
ruin a rail in seconds!
You will attach the new liners to the rails with the rails bolted to the
table. Loosely bolt the rail to the table. Set the new liner in place
on top of two layers of old cloth (you are going to get some glue on the
cloth in the assembly process, so you will need several strips; lay a
feather strip in its channel and move the RAIL up or down slightly to
obtain the correct transition from rail to liner, then tighten the rail
bolts modestly. IMPORTANT: On various models of the old tables, you
may find the bolt holes in the rails will not permit lowering the rail
to the proper height for the new liners to be flush, perhaps as much as
3/8" difference. If that is the case, and before you glue on the
liners, elongate the existing bolt holes using a 5/8 forsner bit in a
drill press. The rail skirt will hide the elongated hole (as will the
bolt washer). Now you can glue and nail the liner and one end-block to
the rail (table is of course level and true). (I use Titebond II yellow
glue to attach the liner.) When dry you can apply the rubber cement,
than lay the new rubber as described below.
Water-soluble contact cement is the best for attaching the rubber to the
liners. Be generous with it. The stretch you want to achieve on a
short rail when laying the rubber is about 1/2 inch, and about twice
that on a long rail. Don’t try to get more than that, and a little less
is fine. Putting on the rubber is definitely a 2-person job; don’t even
think of doing it alone. One person holds the rubber, liberally covered
with dried contact cement, above the similarly covered liner. The
second person lays and gently stretches the rubber along the liner,
seating it firmly upon the liner shelf, then pushing it against the
20-degree face. Cut the excess rubber with a sharp box knife, then glue
and nail the second end-block. It is not imperative that the rubber be
glued to the end-blocks as the ball never touches this point. Easy job
– for TWO people. You can apply cloth an hour after the rubber is
attached.
I cannot overemphasize the
importance of installing rail cloth properly, and by that I mean
TIGHT!!! The bed cloth should be tight, but straight with the weave is
more important. The rail cloth should be so tight you think it will rip
(and a few have). It is a three-person job. To begin, put one person
on each end of the rail cloth with vise grips (I use sheet-metal vises
in which I have glued rubber jaws). One person holds the short tail
firmly, so the person laying the feather strip can concentrate on that
job (I spray the feather strip with 3-M glue to increase its
tackiness). The third person at the long tail is pulling the cloth
carefully in a straight line while the person seating the feather strip
does their thing. (The person normally working with me on the long tail
uses a waist belt with the vise grips and is putting ALL 220 lbs into
the pull.) The pull is so strong that the person on the short tail is
essential – the feather strip alone wouldn’t stand the pull. I use a
couple of 9/16 carpet tacks to lock the ends of the feather strip. Now
you turn the rail upside down to staple down the cloth. Finish the
short tail end. Now the long tail person resumes their pull, being
careful not to pull on a bias away from the feather strip (easy to tear
at this point. The other two people work together, one pushing the
cloth over the nose and the rail liner, the other stapling alongside.
European table mechanics lay their staples right together, sometimes
even overlap them to prevent the cloth from relaxing. Use your own
judgment, whether or not you will take pity on the poor fellow who must
remove all those staples next time. Finish the long tail end and take a
break.

John Stauffer, who used the system to put Artemis rubber on his
table, offers the following method to lay the glued rubber onto the
liner. Temporarily attach (brads) a 1/2" strip of poplar, 1/16 to 3/32"
thick, down the length of the top, horizontal surface of the new liner.
Position the strip so it is uniformly 1/16" back from the 20 degree
surface. Then, when putting down the cushion w/ contact cement on it, I
simply place the first several inches of the top-back edge of the
cushion in the mini-step that is at the edge of the strip. My partner is
holding up the long end of the cushion, rotating it a bit as needed. I
then "roll" the cushion over, into perfect position on the supporting
step. I then advance several inches down the cushion, and position it on
the mini-step (at the same time giving it some stretch), and then "roll"
it right into position, pressing it well into position. At the same
time, my partner is applying some stretch as well (she is not strong
enough to over-do it). I just work down the whole length in that
fashion; then trim the end and attach the end-block.


